Sunday, December 27, 2015

TAU SUAN

This year, we celebrated Christmas (2015) with our awesome neighbour, Desmond, Jeslyn and their two lovely daughters (Andrea and Arielle). I bought the little hairclip for them, isn't them sweet.


The food that they ordered for 25pax, but the people celebrating only less than 20 pax. With so much leftover food, both families had to split the food for next day breakfast or lunch. But really appreciate them for buying delicious food over for the festival.

Christmas is for western celebration, but I made Tau Suan (asia dessert) for this occasion. So this is called the west meet the east.

Now get down to work.

Ingredient A:
400g split green bean (mung beans) soaked in water overnight)
1/2 tsp salt5
6 pcs of pandan leaves

Ingredient B:
2 litres of water
200g sugar
6 pcs of pandan leaves

Ingredient C:
66g of sweet potatoes flour
1 1/3 cup water

Ingredient D:
You Tiao (油条)as you wish

Method:
1 Mix the ingredient A, steam over high heat for 30 mins
2 Boil the water in ingredient B, stir in the sugar til dissolve. Next put in the pandan leave and bring to boil, remove and throw the pandan leaves away
3 Mix ingredient C
4 Slowly stir the mixture C into the sugar syrup, must keep stirring til the syrup is thickened.
5 Add in the steam split green beans (mung beans), stir well, remove from heat.

Enjoy :)


 Alice bulldog really enjoyed her share of Tau Suan
 

Friday, December 25, 2015

CHERRY YOGURT MUFFIN

This is the basic yogurt muffin which I loved so much as it consist of yogurt (which is my fav).
I can simply put any fruits in this muffin recipe which healthy and best of all is using oil instead of butter.

You can put strawberry, blueberry or even cherry which I am using for this muffin, yes even bananas which will taste great.

Now get down the recipe which took me about half an hour to prepare

Ingredient:

1 egg
1 cup of plain yogurt
80g of any unflavour oil
1 tsp of vanilla extract (homemade)
260g of flour
100g of sugar (reduced to 80g)
1 1/4 tsp baking powder
1/2 tsp baking soda
cherry (seed remove using the cherry seed remover, if you are interested to get one, email to me @ uniqniness@yahoo.com.sg)


Method:

1 Preheat the oven 190 deg C
2 Combine the egg, yogurt, oil and vanilla extract in a bowl, mix well ( I am using just the hand whisk will do)
3 Shift the flour, baking powder and baking soda
4 Using folding method, fold the wet ingredient into the dry ingredient and stir only until the all the ingredient are combined and moistened (the batter will be thick)
5 Fill the muffin liner half and put in the cherry, next cover the cherry with the batter.
6 Place in the oven and bake for about 25mins (accordingly to my oven) or until toothpick inserted came out clean.

Enjoy:)


CRINKLE COOKIES FOR THIS CHRISTMAS (2015)

Hi everyone Merry Christmas whoever that read my blog today. For this Christmas treat, I fix on crinkle cookies which I read on FB that is a great bake for Christmas season. So here I go for this little cookies which I failed once (maybe I had made some mistake on the previous recipe) but this time is a success for me as my girl with golden tongue say is nice and request for more.

Make these little for my friends in my company, I will not consider them as my colleague but as friends. During my stay in my company, they will help me a lot in terms of work or even give me advice especially Christina which we had been colleague cum friends for the past 11 years. I dun know how long we will stay together in the company but really appreciate her to be there for me whether in terms of work or personal.

Thanks Elcy and Alice for all the advice that had been given and look out for me when nobody in the company cares about my little dept (which consist only two ppl working)

Ok now that all for the little thought of appreciation from me (even though they might not know my blog), now get down to business.

These crinkle cookies is rolled in powder sugar so that when it is baked, expand and crack that is why the name crinkle is given.


Ingredient
 170g of flour
340g sugar
60g cocoa poweder
78g unflavoured oil
113g baking chocolate, melted and cooled
3 eggs
1 1/2 tsp vanilla extract
1 tsp baking powder
powdered sugar

Method

1 Preheat the oven 175 deg C
2 combine sugar, oil and melted (cooled) chocolate in a bowl, mix well using a mixer (medium speed).
3 One egg at a time, mix to the wet ingredient and add in the vanilla extract
4 Shift flour, cocoa powder, baking powder in another bowl
5 Pour the dry ingredient into the wet ingredient, then gradually stir til the mixture is well combined
6 Place the cookie dough into the freezer for half an hour, for it to be solidified for easy handling
7 Use a teaspoon to guide for the size of the cookie dough, I felt that half of the teaspoon of the cookie dough is good enough
8 Roll the cookie dough onto the prepared powder sugar, the dough must be completely coated, then transfer to the baking pan
9 Place in oven for 10 mins (if you are using a full teaspoon dough, the timing is about 15 mins for my own oven)
10 Remove from the oven and let it cool in the baking tray for a few minutes, if not the cookies is too soft to transfer to the cooling tray.
11 Serve

Enjoy :)


simply love the reindeer container from taobao

Wednesday, December 16, 2015

LADYFINGER

Wanted to make some Tiramisu, but have to find ladyfinger, not every supermarket is selling. To me, one pkt of ladyfinger (store bought) is too many for me, and I managed to find how to make my very own ladyfinger from here http://www.joyofbaking.com/Ladyfingers.html.

Whenever I made this ladyfinger, my girl will be hovering around the kitchen waiting for the ladyfinger to be done. She loved to eat the ladyfinger on its own. As the texture is soft and pliable, you freeze the ladyfinger. It is best to consume with the day itself.

You can't compare the store bought ladyfinger which is crisp and firm.

Let get down to work!

Ingredient (i am making a smaller batch as compared to the attached link)
65g cake flour (I replaced 10g of corn flour, 55g plain flour)
3 eggs in room temperature (egg yolk and white need to be separated)
25g sugar (for egg yolks)
36g sugar (for egg white)
1/2 tsp vanilla extract
1/8 tsp cream of tattar


Method
1 Preheat the oven 175 deg C and line the baking tray with greaseproof paper or reuseable baking mat, please see below for sample of the 油纸 which i had been using.
If you are interested to purchase the reuseable baking mat, please refer to this link http://missbakerlady.blogspot.sg/2015/12/reuseable-baking-mat.html 

 
2 Prepare piping bag and nozzel (please see below for the nozzel that I am using, I am not sure of the size, sorry)

 
3 Beat the egg yolks and sugar using a mixer in high speed, mix til the mixture becomes thick and pale yellow (when you raise the batter should fall back into the bowl in a slow ribbon)
4 Beat in the vanilla extract.
5 Shift the cake flour over the batter but do not fold in, just leave it aside
6 In a clean bowl, whisk the egg white til foamy, add in the cream of tartar.
7 Add sugar in three addition to the egg white, and beat til is stiff peak
8 Fold the egg white into the egg yolk and flour mixture in three addition, mixing only until incorporated.
9 Transfer the batter into the prepared piping bag, holding the bad in 45 deg angle to the baking sheet, pipe the batter to the size you desired. Remember to leave about one inch space between each cookies
10 Once finished with the piping, bake the cookies for 10 mins or until ladyfinger are firm but barely browned and are still spongy when touched.
11 Once done, leave the cookies cool for a few minutes before transferring the cookies onto the cooling race. Do not leave for too long if not the cookies will stick to the greaseproof paper and difficult to remove.
12 Leave the cookies to complete cooled before using. If you do not intend to use the cookies straight away, freeze it.
13 To store, place a piece of greaseproof in between the ladyfinger and can freeze up to two weeks.


enjoy :)

REUSEABLE BAKING MAT

Tired of buying greaseproof paper or even baking paper for the base of the baking pan which only can be used once, then it will be fed by the dustbin.

Now I am using the reuseable baking mat, the mat is 40 x 60cm which quite a big piece. Can be cut to fit your baking pan be it 6inch, or even 10 inch. This is going to save me $ and time (just in case I run out of greaseproof paper, ha)

Greaseproof, baking or parcement paper can only be purchased at those store that selling baking need, not every place had such store round them.

Here is the photo of the baking mat that I will selling:


Price : SGD 6/pc (does not include postage)
If require postage please drop me a mail at uniqniness@yahoo.com.sg, I will advise the postage charges to you.
Please note for normal postage opt, I will not be responsible for any lose of item.


Happy purchasing :)

MANGO STICKY RICE

Have you tried mango sticky rice from Thailand which is their fav dessert. Went to Thailand end Nov 2015 looking for this dessert, then I realised that this dessert is not cheap at tall, cost me about SGD 8 per serving. Wow. Now I can make my own Mango sticky rice to my own liking, I can control the coconut milk and sweetness that added to it, eat as much mango to go with the rice, all under my own control.

So now we get down to the recipe:

Ingredient
150g Glutinous rice
170ml + 30ml Low fat coconut cream (1 pkt of cream is 200ml)
1 tbsp. sugar
1 tsp salt
1 mango

Method
1 Soak the Glutinous rice overnight
2 Pour the 200ml of coconut cream into a saucepan, add sugar and salt,
3 Put on the stove to melt the sugar and salt, once melted remove from heat
4 Pour 170ml of the coconut mixture into the soak glutinous rice, mix well. The rest of the coconut reserved.
5 Cook the glutinous rice using rice cooker or you can even steam the glutinous rice abt 25min or until the rice is translucent.
6 While the glutinous rice is cooking, peel the mango and slice to your desired size or you can cut into cube.
7 Once the glutinous rice is cooked, stir the rice and transfer the rice to a bowl, then invert it on the plate for serving
8 Add in the mango which had been sliced earlier on the plate, drizzle the reserved coconut milk over the rice and serve.


Enjoy :)


Sunday, December 13, 2015

SWISS ROLL (no oil/butter) WITH CUSTARD FILLING

Just happen to read that custard filling is also great for Swiss Roll, which my whole family don't really like whipping cream filling, so this is another alternative.  Only my hubby don't like custard but my girl loved custard, she will always asked me to cream puff for her as she loved custard.

Here is the link to the egg custard recipe :
http://missbakerlady.blogspot.sg/2015/12/egg-custard.html


Here comes the recipe for the swiss roll which don't required any oil or butter yet is soft and moist:

Ingredient:

baking pan size: length 32cm, width 25cm, height 2cm

EGG YOLK BATTER
4 egg yolk
1 whole egg
50g cake flour (I replaced with 8g corn flour, 42g plain flour) shift
40g milk
10g corn flour
10g sugar

EGG WHITE
4 egg white
1/4 tsp cream of tartar
50g sugar

violent paste colouring

Method:

Preheat the oven 160 deg C

Prepare a baking pan line with greaseproof paper, do not grease.

1 mix the egg yolk, 1 whole egg and sugar well
2 add in the milk and mix well
3 next add in the shift flour mix well and set aside
4 beat the egg white til bubbles is form, add in the cream of tartar
5 add the sugar into three additional, beat til the egg white is in stiff peak form
6 scoop 1/3 of the egg white and mix into the egg yolk batter which is set aside. (remember don't stir use folding method try not to deflate the egg white) next another 1/3 til all the egg white is already used up
7 scoop about three tablespoon of the batter and add in the violent paste colouring and mix well
8 put into a piping bag and design your swiss roll as your wish
9 pop the baking pan into the oven and bake for three mins
10 remove from oven and pour the rest of the batter on top of the design you had created
11 level the batter
12 bang the baking pan a few times on the table top to release air bubbles in the batter
13 send the baking pan again to the oven for 20mins.
14 test the doneness using a toothpick which will came out clean
15 once is done, invert the cake on the cooling rack, remove the paper while the cake is still hot
16 invert the cake on silicone rolling mat which is meant for the swiss roll and roll up
17 let the cake cool in the silicone rolling mat
18 once cool, unroll the cake and spread the custard filling onto the cake and roll up again.
19 put into the fridge for a few hours before consuming

below is the pix of the silicon rolling mat, if you are interested, you can email to me @ uniqniness@yahoo.com.sg (please take note the silicon rolling mat require preorder so you will not able to receive your item in a short time)

The size of this silicon rolling mat is width 30cm, length 35cm.

below is the pix of the finished cake:

with custard filling


roll up swiss roll


after cutting into pieces

enjoy :)

EGG CUSTARD

This is the simple egg custard recipe with few ingredient yet delicious and most importantly is easy to make.

Let get started:

Ingredient:
1 whole egg
250g milk (I used low fat milk)
25g cake flour (I replaced with 4g corn flour, 21g of plain flour)
50g sugar
10g butter

Method:

1 beat the egg and sugar til the mixture is pale yellow
2 add flour in the egg mixture, mix well
3 boil the milk til boiling stage, remove from fire
4 pour the boiling milk into the egg mixture into two addition, mix well
5 pour the milk and egg mixture back to a clean saucepan, and cook it over low heat. Remember to stir constantly as it will get burnt easily
6 cook the mixture til it get thicken, remove from fire
7 now add in the butter while the mixture is still hot, stir well and let to cool.


This custard is great for cream puff or even for swiss roll (if you are not a cream lover)

enjoy :)

Sunday, December 6, 2015

MILO BREAD

Wanting to bake something simple with only a few steps as today I am not feeling quite well, but still wanted to bake.

With the help of bread machine (which really my making bread life easier), just put all the ingredient and let the machine run.

So below is the ingredient:

380g bread flour
88g sugar
4g salt
8g instant yeast
1 egg
85g milk or water
24g milo (if you wish to add more is ok)
120g tangzhong (25g water + 125g water)
40 unsalted butter

Method:
1 add in the egg, tangzhong and water
2 add bread flour and milo
3 add sugar and salt (put in one corner for each ingredient)
4 make a hole in the middle to put in the yeast
5 press "dough" on the bread machine and let it run
6 after 5 min add in the butter
7 after the first proof from the bread machine, remove and knead slightly, divide the dough into half and let it rest for 15 min
8 start to shape the dough accordingly to the size of your loaf pan.
9 now is the second proofing, once the dough double its size and ready to send for baking
10 preheat the oven 170 deg C for abt 20mins.

enjoy :)

Tuesday, November 24, 2015

PRE LOVE COOKIE CUTTER

I would like to let go of my pre love cookie cutter which not only can imprint adorable print for cookie, and it is also good for making mooncake imprint.

When中秋节arrive, these little mould can be used. I had used it for making oven baked mooncake and also snow skin

小丁噹 mooncake (oven baked)


Price : sgd 4.00/set (as per photos)
 
Self collection will be at Serangoon or Punggol Mrt during weekdays at 6.45-7.15pm, weekends will be at my own convenience.


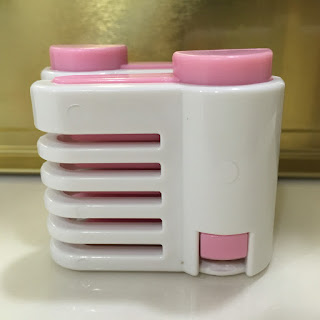
CAKE LEVELER

Got problem slicing the cake into three or half, fear not with the help of the cake leveller, cake can be cut more nicely and evenly.

Price : sgd 5.00/set
Price : sgd 7.00/set (include normal postage)

For normal postage, I will not be responsible for any loss of item.

Self collection can be arranged at Serangoon or Punggol Mrt during weekdays ard 6.45-7.15pm. Weekends can be arranged at my own convenience.


3D ANIMAL COOKIE CUTTER (ONE PC PER DESIGN AVAILABLE)

3D animal cookies cutters to Seyour little ones and at the same time to have a bonding time with them.

The young ones can make their own cookie dough, decorate them, bake it and finally eat them. They will be truly delighted to see the adorable animals.

Price : sgd 4.00/pc
Price : sgd 3.50/pc (three pcs onwards)
Price : sgd 3.00/pc (pre order waiting time one month, at least 30pcs per pre order)

Self collection will be at Serangoon or Punggol Mrt during weekdays at 6.45-7.15pm, weekends will be at my own convenience.

Total there is 18 different design available


Monday, November 16, 2015

Japanese Cotton Cheesecake

Still left one bar of cream cheese siting in the fridge so decided to make cheese cake but not the one with the crust, came across this recipe from Fiona Lau which excite me to try to bake this. The texture is soft, cottony and the cream cheese is not too overpowering.

Ingredient for 8 inch cake pan

227g cream cheese (I used cowhead, not bad)
128g milk
46g unsalted butter
4 egg yolks
4 egg white
80g sugar
1/4 tsp of cream of tartar
26g cake flour (21g plain flour, 5g of corn flour)
14g corn flour

Method as follow:

Preheat the oven 150 deg C and bake for 1hr  (in the lowest rack) using water bath method

1 Melt cream cheese, butter and milk over a double boiler. Cool the mixture. Fold in the flour, corn flour, egg yolks and mix well.

2 Whisk the egg white til foamy, next add in the cream of tartar which will help to stabilize the egg white. Add in the sugar in three additional and whisk til soft peak form.

3 Add in the egg white to the cream cheese mixture and fold well.

4 Pour the mixture into the 8 inch cake pan (light grease and line the bottom and side with greaseproof paper

5 Add hot water into the tray up to half way and place the 8 inch cake pan on the tray.

6 Bake the cheesecake for 1hr or until set and golden brown (baking time is depend on your own oven)

7 Leave to cool in the oven with door ajar, about 30mins as sudden changes of temperature may cause the cake to collapse.


Isn't it beautiful, with no crack on top of the cake and the texture is soft and fluffy.

Enjoy :)

Scissor and Pin for Buttercream

With the use of the pin and scissor now the beautiful flower that u had created can transfer to the cake easily. The dia of the pin is abt 3cm.

The price for this set will be sgd 8 (exclude postage) I will not be responsible for loss of item if normal mail is opt, price will be sgd 10 (include postage)

Able to meet up only at punggol or serangoon mrt during weekday around 6.40-7.10pm

Sugar bread (白糖面包)

Sugar Bread (白糖面包)

This is a simple bread which is liked my whole family especially my FIL (which is his fav).
The bread is soft due to 汤种法, I love this method so much as it help the bread to be soft and nice, but I realised is that the bread can't keep longer than three days. Anyway, the bread will be finished within the next day, so that is no issue to it :).

Let get down to see the ingredient for this soft and sweet bread:

Ingredient

230g bread flour
160g cake flour (which I replace by 135g plain flour, 25g corn flour)
100g sugar (which I had reduced to 85g as I will be spreading sugar on the bread itself)
1/2 tsp salt
3 tsp of instant dry yeast
20g milk powder (which I had omitted due to no milk powder available)
2 eggs weigh abt 60g each
15g water/milk
Tangzhong (汤种)75g (15g of bread flour mix with 75g of water/milk)
60g of unsalted butter

Here come the method:

I had used bread machine to help me to mix the dough and for the first proof

below is the ingredient sequence to be placed in the bread machine

egg, tangzhong, water/milk, flour mixture (bread and cake flour shift), sugar (to be put in one corner of the bread pan), salt (another corner of the bread pan), yeast (make a hole in the centre), milk powder (another corner of the bread pan) and lastly butter (to be placed 5 min later when the machine start)

After the first proof, divide the dough into 30g (I can get 14 small dough) and rest the rolled dough for abt 15 min.

Now can start to shape the dough, roll out the dough into oblong shape and roll up in lengthwise.

Place the 收口facing upward getting ready for the second proof for abt 40mins.

After second proof, brush a layer of water on the dough and sprinkle sugar and is ready to bake.

Preheat the oven 180 deg C for abt 15mins.

Invert the bread onto the cooling rack.

Once the bread is cool, is ready for breakfast or tea break (is all depend on you)

Enjoy :)