Friday, April 16, 2021

Ham Ching Peng

 This is my girl's favourite snack, when I came across this recipe I am so excited to try it. As now I just mastered the control of frying.

Everything is from scratch, even the red bean filling is homemade.

So let's get started

Ingredient

Dough

Plain flour 200g

1/2 tsp baking power

1/4 tsp five spice powder

2 tsp sugar

1/2 tsp salt

1/4 tsp instant yeast

120ml water

1/2 Tbsp oil

White sesame seed

Red bean filling

75g red bean

85g sugar

1 Tbsp oil

1/8 tsp salt

1/2 Tbsp glutinous rice flour + 1 Tbsp water

Instruction:

Red bean filling

1    Soak the red bean overnight in the fridge

2    I used the steam function on my rich cooker to cook the red bean. Pour enough water to cover the          red bean in the rice cooker pot and let the cooker do the cooking

3    Once the red bean is tender and let it cool slightly, blend the red bean into a smooth puree using a          blender

4    Strain the red bean puree using a strainer to get the smooth paste

5    Add in sugar, oil, salt and the glutinous rice mixture, mix well

6    Bring the mixture to boil and turn the heat down when paste starts to thicken, stir continuously

7    Cook until a smooth paste is form,

    Divide the paste into 10 small balls

Dough

1    Shift flour, baking powder, five spice power and mix well

2    Add sugar, instead yeast and salt into the flour mixture

3    Next add in water and knead into a dough

4    Add oil and knead til a smooth dough is form for 5 mins

5    Cover and proof for 45 mins

6    After proofing, cut the dough into 10 equal pcs

7    Take the red bean filling to be wrapped by the dough and roll into shape of ball, tighten the edge

8    Flatten the ball and let it rest for 10 mins

9    Prepare the fryer

10    Brush the disk with water and sprinkle sesame oil and fry til golden brown on both side. The                dough will puff up


Enjoy!!

Doughnuts

 Doughnuts is all time favourite snack in my family, finally got up the courage to try the recipe.

Literally, I really don't like to fry. I got the problem of controlling the heat of the oil, most of the times is a disasters but I do have a good chef in my family which is my MIL, she will help to do the frying. But this time, I really wanted to try it out on my own and it turned out to be a success. Yippee.

So let's get started

Ingredient

Milk 110g (replaced by 20g condensed milk, fill with water til reach 110g)

Yeast 5g

Plain flour 300g (shifted)

Sugar 35g

Salt 3g

1 egg

Softened butter 40g

Instruction

1     Mix milk with yeast and set it aside

2     Combine shifted flour, sugar and salt

3     Add egg into the flour mixture and mix 

4    Next add the soften butter and mix

5    Add the yeast mixture into the flour mixture into 3 batches, every batch poured in mix well

6    Once the last batch of the yeast mixture had poured in, knead til a dough is formed and let the             dough rest for 10 mins to let the water to be absorbed into the flour

7    After 10 mins, knead about 5min to form a smooth dough

8    Cover the dough and let it proof (double in size) which took about 45mins

9    When finger insert into the dough, the dough do not spring back that means the dough is ready

10    Take out the dough to release the air and cut into 15 equal pcs

12    Shape the doughnut

13    Let the doughnut proof another 30mins

14    Fry til golden brown on each side

15    Let the doughnuts cool down before coating with sugar


 Tips:  

For frying, I will used a chopsticks to test the heat of the oil. Once there is bubbles appear around the chopstick, the oil is ready for frying at this point of time I will turn down the heat.

Hope this tips helps.

Enjoy!!

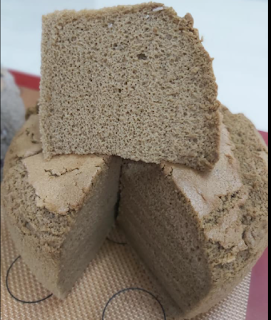
Ma Lai Gao

 Simple Ma Lai Gao is up which I liked it, simple ingredient and simple steps to achieve the texture.

Just searched on net for the origin, there is so many versions, can be from Malaysia, Hong Kong and even in England. Anyway, no matter where this steam cake originated from, the most important is taste great.

So let's get started.

Ingredients

Cake flour 125g (replaced by 21g corn flour, 104g of plain flour)

Baking powder 7g

Black sugar 70g

Milk 85g (replaced by condensed milk 10g, filled with water til reached 85g)

2 eggs

Corn oil 25g


Instructions

1    Beat the eggs


2    Add in Black Sugar, milk and corn oil, mix well


3    Next add in shift cake flour and baking power, mix well till no lump appear


4    Strain the batter to get a smooth batter, I used a lightly oil 6 inch pan, let it rest for 10 min so the         baking powder to react its purpose. At this point of time, prepare the steamer.


5    Once water boiled, put the pan into the steamer, reduced the heat to medium heat and steamed for         25mins. Unmold only when the cake had cooled. I had sprinkled some sesame seed, you may opt it       (When using glass lip, please cover the lid with a piece of cloth so that the water will not drop onto         the steamed cake)


This recipe is a keeper and is successful. Just love the texture of this steamed cake.

Hope you would try out this recipe.

Enjoy!!


Friday, April 9, 2021

Basic Chiffon Cake (Mocha, Matcha and Pandan)

 Chiffon Cake can be lot of favor, depend on what you are looking for.

Below is the basic recipe for the chiffon cake, which I had baked to my liking.

Basic ingredient:

Original 

Cake flour 50g (I used 10g corn flour + 40g plain flour)

3 eggs

30g water

30g oil

30g sugar

Flavor Chiffon cake:

Cake flour 50g (I used 10g corn flour + 40g plain flour)

3 eggs

Mocha (3 tbs milo + 1tsp instant coffee), Matcha (10g of macha powder) or Pandan (40g of pandan juice, omit the 40g hot water)

40g hot water

30g oil

30g sugar

Instruction:

1     Mix the oil and the liquid til combine

2    Add in the flour til no lump appear

3    Separate the egg yolks and white (take note the bowl must of water and oil free for the egg white)

4    Whisk the egg yolks into the flour mixture and leave it aside

5    Whisk the egg white, add sugar into 3 batches till stiff peak

6    Scoop the stiff egg white into the flour mixture in 3 batches. Do not mix the mixture in circular              movement which will deflat the egg white, please use cut and fold method.

7    Pour the mixture into 6" removable pan and bang on the table about a few times to release the air            bubble

8    Pre heat the oven 150 deg C and bake for 50 mins or until a skewer inserted and come out clean

9    Bang on the table for a few times and invert the cake til cool before unmoulding

Matcha


Mocha 


Pandan


 Enjoyed!


White Sponge Cake (白糖糕)

 白糖糕 (White Sponge Cake)

This is my grandma favorite kueh, whenever I saw this kueh, always remind me of her. It is a pity that I didn't mange to make this kueh when she was around.

Anyway, I managed to get a good recipe for my keeper.

Ingredient:

Mixture A

150g rice flour + 80g water

Mixture B

100g white sugar + 200g water

3g instant dry yeast

Instruction:

1    Combine Mixture A, large lump will be formed, leave aside.

2    In a small pot, combine mixture B and bring to boil and stir until sugar is completely dissolved.              Turn off the heat and immediately  pour the boiling sugar into the Mixture A. Whisk until no lumps        to be seen and a smooth batter is formed. Cool til lukewarm.

3    Add in 3g of instant dry yeast to the cool mixture, stir til there is no yeast lump appear.

4    Cover the mixture and leave it to ferment for two hours (Singapore is a warm country so I had left          on the countertop)

5    After two hours, you will able to see foamy bubbles on the surface of the batter, the batter is ready         for steaming.

6    Lightly oil the 8" pan, pour the batter and steam it for 20 mins using rice cooker under steam                 function. (Remember to put a cloth to cover the lid so that the water droplet will not fall onto the             cake when open). If you wish to use the steamer, bring the water to boil then place the pan to steam       for 20 mins, do not open the lid, let it rest for 2 min then open the lid.

7    Let the steam cake cooled down completely before cutting into your desire size.


 Enjoyed!